Few Guidelines in Creating a Custom Module in DotNetNuke 3.0
First step in creating custom modules in DotNetNuke is to load the empty module successfully in to the nuke portal. There onwards, of course adding functionality to it is as same as working with ASP.NET. So, in this article I focus on few steps pertaining to nuke, that would help you to load a module to the nuke portal with out any errors. Also I assume that one should have some familiarity with the DotNetNuke portal before reading this material.
When we are working in the nuke portal we should have a little idea about how nuke portal works. This explanation is a bit large. So I would simply say that; we should stick to the pattern that the core team used to create and deploy the module in the nuke. That is it follows a standard.
(How DotNetNuke works will be explained in detail in the another article)
Here are some points which need you need to keep in mind.
-> Open the nuke solution.
-> Add a nuke project to the solution. EX: TrainModule
Building the project out side the nuke solution is also possible; but in order to run the project, the entire solution is needed. Since the module that to be loaded can only be tested with in the nuke portal and not outside of it. There for adding the project to the solution is very important.
 -> Since we are not doing any functionality at this phase just comment all the method implementations.
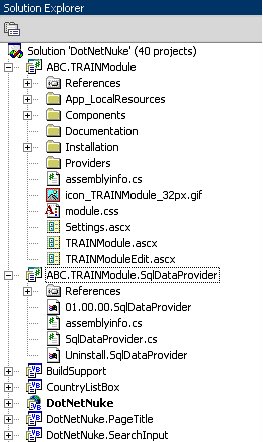
-> Add the SQLDataProvider project to the solution; as per the location; select the provider folder of the first module (EX: TrainModule) you already created.
Now you have 2 projects in the solution apart from what was already there in the solution.
It will look as follows.
Now before you build the solution, make sure set the dll paths correctly so; right click on the solution and select properties -> configuration and click on output path, and select the location as; DotNetNuke(where the DotNetNuke is installed the main folder name )-> Bin. (This will be the common place where you save all your dlls, in nuke modules). And build the projects separately and then the solution.
When building the Dnn solution make sure that you do not build the existing modules which were not developed by you; by this way you can avoid building the existing modules.
One significant point here is that lets just assume that you need to create a module which will not have and dealings with the database. But still you would need to add the SQLDataProvider module as per each project. Why is this? This is because nuke portal keeps a track of every module that’s been installed to the nuke portal with in its database. There fore when we try to load a module that’s been installed to the portal; at the load time it searches the database for the information required for loading the module; this connectivity will not be available if we do not have a SQLDataProvider project linking to your module. – (Please note that this particular explanation depict the way I understood; and not from any references)
Now you have two projects, one with the TrainModule and the other TrainModule.SQLDataProvider with in the DNN solution and the corresponding dlls of them as well.
Now let’s see how we can add this module to the Nuke portal.
There are two main ways of doing it. Either we could upload the module; which is simple as uploading a zip file. And the other is to add the module specifying the view/edit and settings. Here I will explain the second method; since most of the problems encounter there, and since it involves few things to remember.
Here are the steps we need to perform in order to add a module to the nuke portal.
-> Add a New Page to your Portal.
(This is not explained here; hope you already know how to do that)
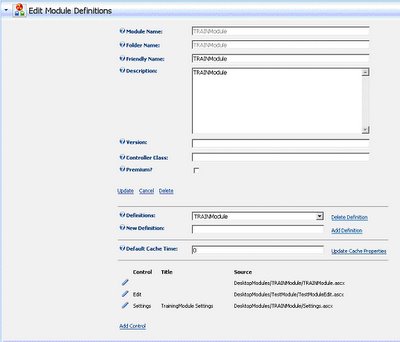
-> Host -> Module Definitions -> Add Module Definition
There you will get a page as follows to fill. Just give the module name, folder name, friendly name (the way you want it to appear in the module list) and a brief description (which will help you to identify the module once you do to its definitions)
Then paste the module name in the New Definition section and click on Add definition. Then you will get an empty location where you have to specify the control, title and the source.
Now to add your controls, click on Add Control.
The following screen shot displays once all controls are added.
Let me show you how to add the controls which are listed above.
There are 3 main ascx pages we need to set as controls. They are the view page, edit page and the settings page.
View Page
Key:
Source: TrainModule.ascx
Type: View 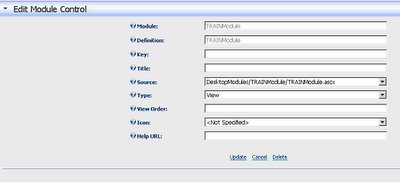
Edit Page
Key: Edit
Source: TrainModuleEdit.ascx
Type: Edit
Settings Page
Key: Settings
Source: Settings.ascx
Type: Edit 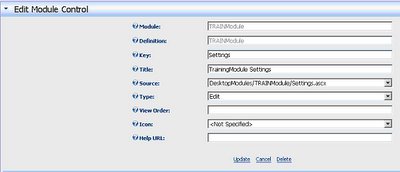
Title is not given since you may give an appropriate title such as: TrainModule Settings.
Also please note that the source need to be the full path where you can select from the drop down list but there I’ve mentioned the name of the file which you need to look for.
Now that the module is installed, let’s add this module to a page and see how it is.
Go to the page where you need to add the module and select the module and the containers of the page where you need the module to be displayed and click on add.
If every thing had worked fine, you will get a result as follows.

As you see this module does not have any functionality yet, it’s a matter of adding the functionalities and the coding is as same as working in asp.net. Now that you have a successfully loaded module in hand, you can start off implementing the functionalities you expect.
posted by Gayani Devapriya @ 5:07 PM
![]()
2 Comments:
Nice, Keep it up and write more
Hi My Akkio,
Nukelifying.
Good job.
Post a Comment
<< Home